Showing posts with label Window Azure. Show all posts

Thursday, April 26, 2012

"Add Deployable Dependencies" option in Visual Studio 2010 When you want to deploy ASP.NET MVC application

0 comments

I would like to share this option for the developer who are using Visual studio 2010 for development and working on ASP.NET MVC application. When you try to host your application (ASP.NET MVC) on window server and if you server haven't installed MVC then you might be get following type of error.

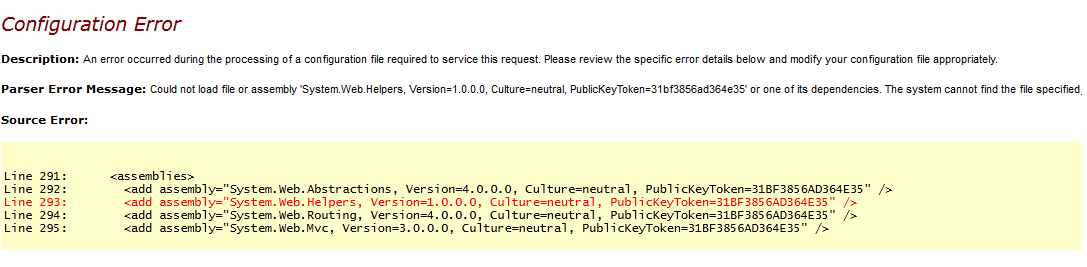
Could not load file or assembly 'System.Web.Helpers, Version=1.0.0.0, Culture=neutral, PublicKeyToken=31bf3856ad364e35' or one of its dependencies. The system cannot find the file specified

Thursday, February 16, 2012

Swap VIP in Window Azure

0 comments
Swap VIP is very good feature available in Window azure, I would like to described here about that with good reference link.

What is SWAP VIP ?
There are 2 type of environment on which you can deploy on window azure application.

Staging
In other word you can say testing environment, having similar configuration as per production. Before deploying to production (where actual user will use your application) you can deploy to staging to fix bugs, test security issues, configuration problem etc.

Production
It is actual environment where you can move tested staging application which will be used by real users. (you can directly deploy your application if you are confident on your testing!!)


In sort Swap VIP is azure feather to move application from staging to production by just one click!

How to use Swap VIP?
After testing your application just click on Swap VIP as per shown in above fig.and click ok and it will transfer from staging to production with zero downtime of your original application!

What will happen while swapping?
If you have notice DNS when you have created staging would be as per below.
ID + Cloudapp.net

and in production DNS would be actual URL with something like myapp.cloudapp.net
When you going to swap azure will just transfer this DNS entry.

Reference Links


Step by Step : Upload asp.net web application to Window Azure

0 comments
Window Azure is in demand for cloud hosting to host asp.net web application and make scalable that application as per retirements, so I would like to describe here step by step to upload asp.net application on window azure. so let's start!
  1. Create New Project > ASP.NET web application


  2. Create New Cloud Project and Just click OK without selecting anything

  3. Go to Cloud Project > Right click on Roles Folder > Add web role from solution as per below fig.


  4. Here you can configure your cloud project with .csdef config file (you can also add stratup task in that.)


  5. Build Solution then right click on Cloud Project and click Publish, it will open dialog as per below.

  6. Here i will go through "Create Service package only" which will create published files to upload manually on window azure portal, if you want details on 2nd option then please refer this link for Getting Started with the Windows Azure Tools for Visual Studio

  7. Click on "Configure Remote Desktop" if you want RDP connection to that application and chose certificate and credentials as per below

  8. Click Ok on both dialogs and it will generate 2 files which we need to upload on Window azure portal


  9. Create "New Hosted Service" on azure portal then fill details, choose certificates and browse 2 published files in step-9 and click ok


    cheers!


Monday, December 26, 2011

Handle chart rendering on multiple instance of Azure webrole application

0 comments
If you would like to know how chart rendering occurs with different ways in asp.net then this link is great one.

Generally when we add graph , at that time in web.config handlers will be added automatically as per below

  
<handlers>
<remove name="ChartImageHandler"/>
<add name="ChartImageHandler" preCondition="integratedMode" verb="GET,HEAD,POST" path="ChartImg.axd" type="System.Web.UI.DataVisualization.Charting.ChartHttpHandler, System.Web.DataVisualization, Version=4.0.0.0, Culture=neutral, PublicKeyToken=31bf3856ad364e35"/>
</handlers>

<httpHandlers>
<add path="ChartImg.axd" verb="GET,HEAD,POST" type="System.Web.UI.DataVisualization.Charting.ChartHttpHandler, System.Web.DataVisualization, Version=4.0.0.0, Culture=neutral, PublicKeyToken=31bf3856ad364e35" validate="false"/>
</httpHandlers>

and to store graph images in folder we need to put app-setting as per below
<add key="ChartImageHandler" value="deleteAfterServicing=false;Storage=file;Timeout=20;URL=~/TempCharts/; />"<validation validateIntegratedModeConfiguration="false"/>

in this case graph data point will be plotted and image will generated and store that in temp folder (as per appsetting)
and on request that image will be displayed on page .

Now this will work well in window azure up to 1 instance but when you will make more then 1 instance at that time sometimes graph will be empy. why?

because if one request store that image in first server of stack then another request want that graph from different server of stack and it can not able to find there!

So how we can handle this issue on multiple instance

simple solution is instead of temp location we need to use blob storage  provided by Azure.

generally chart control will use custom charthanlder for handling to store images of chart so we need to make custom chart handler that will store chart images in blob storage and from there it will be serve in all instances.

Just code your custom handler as per below


public class ChartImageHandler : IChartStorageHandler
{
CloudStorageAccount account;
CloudBlobClient client;
CloudBlobContainer ImageContainer;

public ChartImageHandler()
{
//Here you get the container to the CloudStorageAccount object
//The proper way to do this is with:
//account = CloudStorageAccount.FromConfigurationSetting("DataConnectionString");
//this is the Dirty way...

account = CloudStorageAccount.Parse("DefaultEndpointsProtocol=http;AccountName=<youraccountstorage>;AccountKey=<yourkey>");
client = account.CreateCloudBlobClient();


//The name of the image container is totatally up to you
ImageContainer = client.GetContainerReference("images");
//if it may not exist, you can use this call to create it....
ImageContainer.CreateIfNotExist();
}
#region IChartStorageHandler Members

public void Delete(string key)
{
CloudBlob image = ImageContainer.GetBlobReference(key);
image.Delete();
}

public bool Exists(string key)
{
CloudBlob image = ImageContainer.GetBlobReference(key);
try
{
image.FetchAttributes();
return true;
}
catch (StorageClientException e)
{
if (e.ErrorCode == StorageErrorCode.ResourceNotFound)
{
return false;
}
else
{
throw;
}
}
}

public byte[] Load(string key)
{
//sometimes load gets called before save is done

CloudBlob image = ImageContainer.GetBlobReference(key);
byte[] imageArray;
try
{
imageArray = image.DownloadByteArray();
}
catch (Exception e)
{
System.Threading.Thread.Sleep(1000);
imageArray = image.DownloadByteArray();

}
return imageArray;
}

public void Save(string key, byte[] data)
{
CloudBlob image = ImageContainer.GetBlobReference(key);
image.UploadByteArray(data);
}
#endregion
}


you need to add reference of this dll found in window azure SdK at C:\Program Files\Windows Azure SDK\v1.3\ref

Microsoft.WindowsAzure.StorageClient.dll

and in web.config just assign that handler in appsetting as per below


<add key="ChartImageHandler" value="deleteAfterServicing=false;Storage=file;Timeout=20;URL=~/TempCharts/;handler=MyApp.MyChartHandler.ChartImageHandler, MyApp;" />


Friday, December 23, 2011

Session state in Window Azure using caching

0 comments
In my previous post , I have talked about different ways to maintain session state in window azure.
From there the best way to maintain session state in window azure is by using appfabric caching, so i am going to discuss it here in details.

1) Create a Cache in Windows Azure

Open management portal , click on servicebus & caching option as per shown in fig-1.


Expand services and click caching , create new namespace as per shown in below fig.


Select service (here cache) add namesapce, location and subscription as per shown in fig


click to view client configuration file.


http://msdn.microsoft.com/en-us/library/gg618004.aspx


2) Prepare Visual Studio to Use Caching for Windows Azure

Verify that the target framework version is .NET Framework 2.0 or higher (non-client profile).

open web.config copy portion of configsection , datacacheclient in web.config,

copy Sessionstate section under system.web


http://msdn.microsoft.com/en-us/library/gg278344.aspx


Related Links

http://www.windowsazure.com/en-us/develop/net/how-to-guides/cache/

http://weblogs.asp.net/shijuvarghese/archive/2011/05/04/usi

ng-windows-azure-appfabric-caching.aspx

http://www.codeproject.com/KB/azure/WA-AppFabric-cache.aspx


Wednesday, December 21, 2011

How to maintain session state in Window Azure

0 comments
In ASP.NET there is concept of a session which is maintained from the user’s first request to their last request for visit of the web site. By default, ASP.NET session is maintained in the RAM of the running web server.

However Window Azure is statless!, web role haven't any local storage.

If only one instance in webrole then usaul session will work but when you make more then one instance then sesion will not work because at any time trafic will be moved to different instance the data center.

generally in web.config session state defined as below

<sessionState timeout="20" mode="InProc"></sessionState>

that is InProc session state maintain in process and will remove after 20 minutes

In Window azure you can maitain session state by following ways

1) By SQL Azure

you can use sql azure database to store session values.

web.config Change

<sessionState mode="SQLServer"
sqlConnectionString="connectionstring"
cookieless="false"
timeout="20"
allowCustomSqlDatabase="true"
/>

Example


2) By Table Storage

you can use storage (table storage) availbale on window azure 

web.config Change

<sessionState mode="Custom" customProvider="TableStorageSessionStateProvider">
<providers>
<clear/>
<add name="TableStorageSessionStateProvider"
type ="Microsoft.Samples.ServiceHosting.AspProviders.TableStorageSessionStateProvider"/>
</providers>
</sessionState>

Example


Download aspprovider from here

3) By AppFabric Caching

You can use appfbric  caching to store session values

web.config Change

<sessionState mode="Custom" customProvider="AppFabricCacheSessionStoreProvider">
<providers>
<!-- specify the named cache for session data -->
<add
name="AppFabricCacheSessionStoreProvider"
type="Microsoft.ApplicationServer.Caching.DataCacheSessionStoreProvider"
cacheName="NamedCache1"
sharedId="SharedApp"/>
</providers>
</sessionState>

Example